Friday, September 30, 2016

Back to basics

When I first received my Zentangle® Primer Vol 1,  I wanted to go through it page by page and really absorb the knowledge. Of course tho, I had to check out all the eye candy before I could get down to studying.  So, a once through looking at the photos, oohing and aahing over the wonderful artwork and wanting to skip right to reticula and fragments!  But, I started from the beginning and things were going fine.  I was referring back to the original Zentangle book, comparing and making notes and moving along nicely until I got to the "your first tile" lesson in the Primer.  Somehow, I just wasn't all that enthused about doing a basic tile.  I got sidetracked, trying new tangles, new techniques (like shades of gray and graydations), preparing for a new class, and just enjoying what I was learning outside the primer.

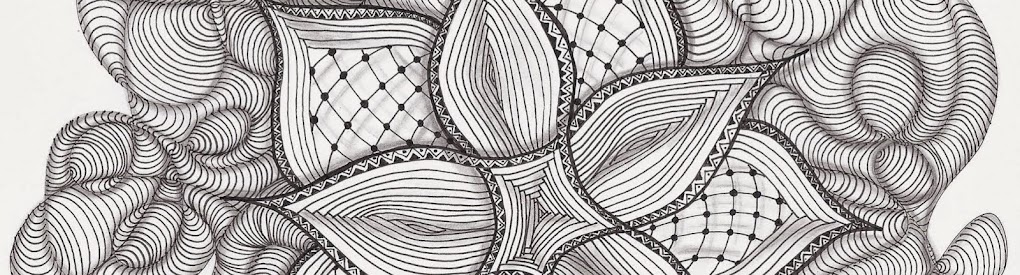
Then vacation came along.  I knew I wanted to get back to the Primer.  So there we were, camped in a beautiful canyon, next to a gorgeous river.  And the timing was perfect for my "first tile" lesson.  Setting in a camp chair, soaking in some sun, I decided to use the tile provided in the book, that extra special one complete with watermark would also help to make this "back to basics tile" special.  I took my time with each instruction and each line.  Going back to known tangles (Crescent Moon, Hollibaugh, Printemps and Florz) was so comfortable, yet I was approaching each as if it were new to me.  And, although I was inclined to do something a little different with the shading, I just followed the instructions.  It was actually comforting to play by the rules.  

Then the exercise was to do the tile again, same tangles but different shading.  Hmmm.  Now a lesson asking for creativity!  So I thought about what I had worked on a day or two earlier, which was making some notes and examples about graydations.  That would totally change the shading, in fact I would be hard pressed to keep it similar!  So I pulled out my new black Pentalic journal that my friend and roommate from CZT14, Dari,(she goes by Dari on the Mosaic App too) recommended.  I had already done the little Bijou tile on the page combining the graydations techniques,  my recent parabolic lines class, Maryhill, Static and maybe a 3V influence as well.  I thought a basics tile using these techniques would be a nice addition to the page.  

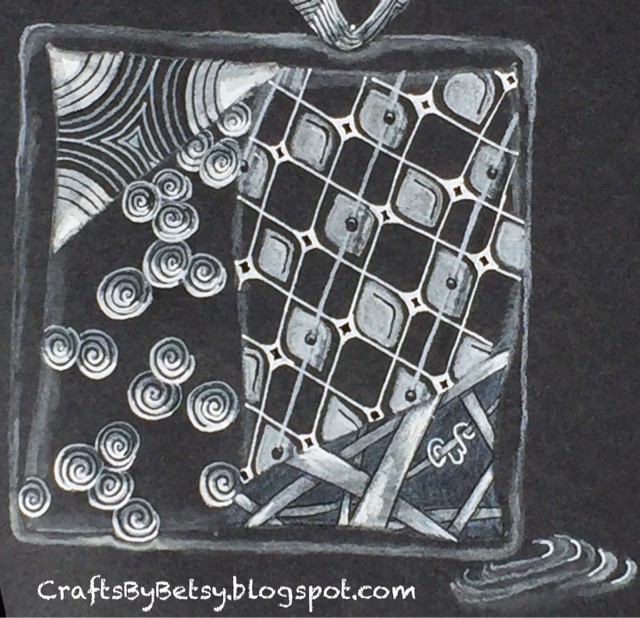
So here you have it, same string, basic tangles of straight and curvy, basic techniques of auras and drawing behind.  And then adding complexity just through layering and some reversal of black and white and of course adding all those grays.  

And here's a view of my favorite page in the primer.  Yes, being a CZT has quite a few perks!  

Friday, September 23, 2016

Bookmarks from envelopes

I don't remember exactly where I first saw a corner of an envelope made into a bookmark but I believe Pinterest pointed me to this blog post where she makes a nice corner bookmark using washi tape.  I immediately started thinking Zentangle®.

I used the same Sizzix die set I used last week and made an envelope from some linen paper.  Making the envelope allowed me to add the decorative die before folding and sealing. I thought these were so pretty! In addition to the Sizzix die, I used a set from Memory Box found here. And then there was room for tangling on the other side...

Tangles are Skwim, Flux, Double 8s and El Prado.  Although the first bookmark above is pretty, it wasn't practical because the pages would get caught in the die cut as I moved the bookmark around. That's when I decided to add a vellum layer you see in the second. Perhaps I'll tangle both sides next time. That would be a nice way to recycle an envelope, especially a piece of mail with a cool postmark or maybe from someone special. 

By the way, if you think that image is cool of the sea shells, it's a freebie from the paint chip section of the hardware store, showing you recommended color combinations when you open it up. (To be used for a later project no doubt ;-)

Friday, September 16, 2016

Class lines

I had a really fun class last week. We focused on parabolic lines and stringing Zendalas®. I prepared these kits in advance. The boxes housed blank Zendalas, a drawing surface, protractor, bijou tiles, pencil and a bookmark ready to be tangled on. I used an envelope die by Sizzix to make the boxes, scoring additional lines to convert it from an envelope to a box.


Wow, look at all those strung tiles!  And all were done without the use of a straight edge!  Cool right?
Check back next week for a closer look at bookmarks I've been making.
Have a wonderful week!

Friday, September 9, 2016

Tangles creeping into life

Sometimes art just creeps in to every little nook and cranny. And if you can make something better, why not do so?

I was updating my paper display guide on a sheet of dot grid Fabriano paper when I decided to add some tangles. I chose the dot grid because the lines are easy that way with no need for a straight edge. Then I realized the dots were subtle enough that I could choose to ignore them just like portions of a string.     

Before color.  Tangles are Skwim, Flux and Tipple.
With colored pencils
After laminating I wrote with an alcohol marker  (or you could use dry erase markers).
And in use on my paper stand.

After all the time taken in drawing and coloring, I decided to laminate it so I could write with any alcohol based marker. That way if I change things up later I can simply wipe it away with rubbing alcohol and not harm the artwork.  In fact, I've already changed it from this purple to a prussian blue that I'm happier with.

Sure, it could have been quicker without the artwork, but my art space is happier... and so am I. 


Friday, September 2, 2016

More stamping and tangling


It's hard to believe that this cling stamp
combined with this stamp block that fits into this gear (all products of Inkadinkado)
created the string for this tangle of Isochor.
It's been waiting some months for me to finish it. I guess it was just waiting for me to catch up with my gray techniques, reticula & fragments. The original circle was die cut from watercolor paper. After stamping the string (I believe I used pigment ink in a light tan or gray...like any Zentangle® string, it disappeared when I drew with my pen) I tangled Isochor with black Sakura Micron.  So that was several months ago.  This week I added Fabrico gray marker around the Isochor cluster. Then my Tripoli reticula with Graphik Derwent Pen adding Prismacolor white pencil and Uniball Signo Angelic for hilights.  Then I added graphite and some more Fabrico cuz I couldn't stop!  I'm really happy with the final(?) result!

Have a wonderful week!