Sometimes it's just hard to make that first pen stroke. The ritual of Zentangle® makes it easier, for sure, but sometimes I just feel paralyzed by current events. The continuing violence and racism that rocks the US, the violence around the world, political rhetoric encouraging fear, hatred and devisiveness really weighs me down. Sometimes I even feel a little guilty because I CAN lose myself in my art. It's tempting to not listen to or read the news. To just hole myself away. But then I think, there's got to be something positive I can do. I need to find my voice. I need to pay attention. I also need to feel the bad so I can recognize the good. But with all this going on, it's really hard to take a first step, even with something as routine for me as making a card or drawing a Zentangle tile.
So I was at square one, unable to make a first mark. This time though I didn't have to make that first pen stroke, or rather, it was already done. I noticed some unfinished
Bijou tiles. When I originally did the step outs for
MoFins, I had started putting them on Bijoux. But then I realized there just wasn't adequate room for me to demonstrate the steps, and I started over with standard size tiles. Of course I didn't throw away the Bijoux. They were just sitting there at the top of my tin waiting for me to notice them. So those first pen strokes were done. It would include MoFins and it had also been predetermined it would be in red and black as thats how each had been started. Once I took that first step, I took another. Once I completed one, I kept going.

Here are the completed tiles. Dragonair, K-Leesi, Hibred, Shattuck, Betweed, Printemps, Tipple, Ahh, Fescu, Striping and Well came out to assist MoFins. My next question was what to do with those little tiles. Then I remembered a square die that I bought thinking...hoping it would work with square tiles. I just hadn't tried it yet. I cut out red, black, gray, white and a silver option (the silver is upcycled from some packaging). The die cuts out the interior square from the frame. It also embosses with a second pass through your machine with a rubber mat. I did add a hand cut "v" in a couple spots to be able to tuck in the bijou tiles. That way they dont have to be adhered and can be removed by the recipient if they like.
Here is the nice selection I die cut and embossed.
I'm sure that the die I'm using is from Crafter's Companion and was in their Create-A-Card Die'sire series. However as I'm typing this, I'm unable to find it in their current catalog. Here is a link to their
main site. I did find an image on-line and I believe it is called Decadence. I am requesting assistance from Crafter's Companion and if I can link you to the die at a later point I will update the post to do so.**update** Crafter's Companion no longer carries this die. :-( They did tell me it's available in the UK, HOWEVER, I noticed that die is 8 inches square where mine is just under 6 inches square.
I ended up cutting a square of contrasting color slightly larger than the die cut square before adding it to a standard A2 hand cut and folded card.
But what to do with all those larger frames? You automatically get both the frame and the interior square when you die cut it. Well it turns out that frame works nicely for a
standard size tile! The logical place, to me, to add the slits had a little more play between them and the tile, so I ended up making four cuts to secure a tile. But then, of course, I'd need to draw a regular sized tile to show off that frame for you! So while I didn't have a tile started, I continued with the MoFins theme on a black tile this time using an oblique pen and Dr PH Martin's Bleed Proof White ink. I added highlights with Zenstone and also used a black identipen and gray Fabrico.
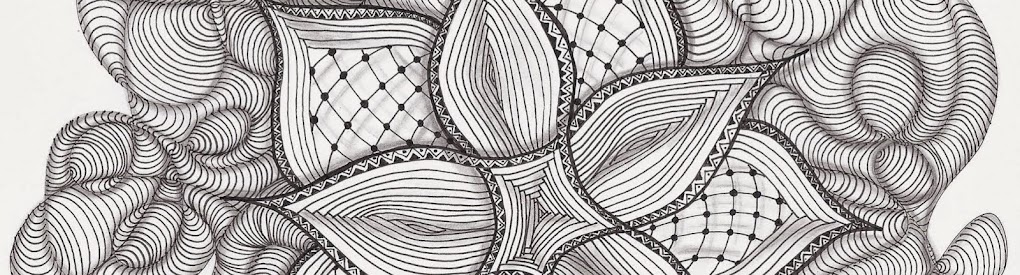
And, go figure, the frame also accommodated a
Zendala! And again, to show you the frame, I wanted to complete a Zendala. My placement of the four cuts as in the frame above ALMOST worked, but just barely caught the edge of the Zendala. So I tried a little different strategic placement of the cuts, a little more snug this time. I couldn't have gotten any luckier with this die. I'm sure it will get a lot of use.
Tangles are MoFins (couldn't stop now could I?), Maryhill, Cubine, Static, Hurry, Tipple and then there's the Scena that morphed into Enyshou with just a touch of Isochor. The frame is from simple black cardstock but I added metallic rub-on in a pewter color and it looks very much like metal now.
So I still don't know what my voice will be. But I am paying attention. And I know that when I take that first step, more will follow.


Amazing! You are such an inspiration to me! Deana
ReplyDeleteNeat stuff, Betsy. What a great blog! I really enjoyed it. Thanks.
ReplyDeletesuper cool!
ReplyDeleteSuch a cool idea to take your zentangle pieces and create beautiful cards out of them. I have been trying to incorporate tangling into my card making, and just drawing straight on to the cardstock and never thought about making intricate cards with paper craft AND adding a whole tablet piece to it! That's so brilliant and they are so beautiful! Really inspirational,thank you so much for posting this.
ReplyDeleteThats supposed to say tangle piece not tablet piece, oops!
Delete