Saturday, June 25, 2016

Maryhill...how could I not?

Thought I'd have a go at Joey's challenge again...Maryhill after all! And I'm so glad to see she challenged us NOT to put it in the center! Truly, the round Maryhill is a great way to learn the pattern, but there is SO MUCH MORE you can do with it!
So I knew the Organic Maryhill that I posted recently, would work for sure in Joey's string, but what's the challenge in that? If you missed it, check out the step-outs here.
So first I went for something a little different...
Straight lines creating curves have been catching my eye lately. Joey provided us with a double circle string (think donut!), and I thought perhaps I could form the center circle with lines. Turns out, it was pretty easy. I drew a circle and made a mark every 15 degrees (I just came up with this arbitrarily but you do need a number that will go into 360 evenly). Then I drew a line between 2 of the dots so that the midpoint of the line was approximately where I wanted the edge of the center circle to be. In mine I think I skipped 7 and connected to the 8th. Then I just moved over 1 dot and continued around the circle. The hardest part was figuring out where to tangle, but I just started where it seemed the best fit, repeated around the entire circle and then picked the next spot. I also realized you can vary Maryhill slightly to begin and end in the same corner, like those diamond shapes... cool!

I was going to leave this as a Maryhill monotangle but I'm so happy I decided to add Fescu to the center. I used black and blue Sakura pigma microns, Graphik Line Maker in graphite, white Gellyroll, Fabrico gray marker, a couple shades of blue Polychromos, Zenstone, General's white charcoal and graphite. Both drawings are in my Strathmore Toned Gray 400 series spiral art journal. The white really pops on the gray. The spiral binding, however, was problematic for turning my work (I do a lot of that with Maryhill).
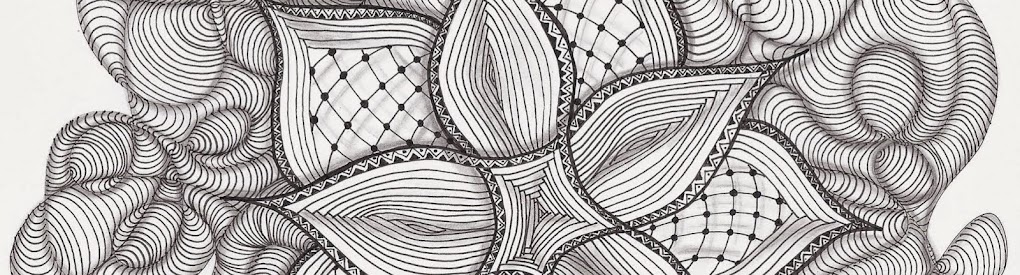
Meanwhile, I was also working on this version. Here's how it started. I was excited to try rounding the center of the tiles. In addition to the tools mentioned above, I used an orange micron, and some orange shades of Polychromos. Tangles in the center of Maryhill are Floo and Tipple.
That was fun Joey, THANKS!
And, possibly, ending my current Maryhill craze, I present my bullet journal. It is a Leuchtturm1917 in lime. I didn't do anything to prep the surface, just started tangling with Sakura's Identi-pens. Initially they worked pretty well and I was able to use the fine tip. Then I realized that my hand was lifting the ink. So, mid-way I got the bright idea to spray it with a workable fixative. While I do believe that stopped the ink from lifting, it also was preventing me from drawing easily. I think the pens were getting clogged with the fixative and it took lots of scribbling on paper to unclog them so they would work for maybe half of the next line. Primarily I was using the large tip after the fixative. After completing it, I added another coat of fixative. We'll see how it holds up. Any suggestions for how to draw on this type of leatherette surface?


Friday, June 24, 2016

Mini-class

... also known as an afternoon of friends and Zentangle....then, wow! Where did the time go?
We started out with "tiles" I had prepared before hand. I wanted the initial focus to be the Zenstone technique and thought we could try out several colors and shapes before slowing down to draw.
They did pretty awesome don't you think?
Then, I was excited to show them the organically grown Maryhill I recently stumbled across. If you missed that post, here's a link to the step-outs.
And if that wasn't cool enough, both sent me photos of their tiles after they finished them at home. (Beaming :-)
Thanks for stopping by, have a great day!

Monday, June 20, 2016

Inspiration and serendipity

I had a mini class last week with a couple of my friends. We played all afternoon with color and Zenstones. The time flew. Both of them shared things they had been working on. I was influenced and inspired by both of them. Deana had a set of Zendalas in white, black and red. I hadn't worked with those colors in awhile and decided I needed to! Terry showed me how she had been working on Paradox. She gave me a beautiful card incorporating it. So, the next day, I started a black, red and white Zendala using Paradox and incorporating our Zenstones using graphite. I finished it up this weekend.  Then today, Monday, the Diva challenge #272 is black, white and red all over! Zentangle® and serendipity. They just go together.

Tangles are Paradox (with Triangulation technique), Squid and 'Nzeppel.
before shading,  Zenstone and Triangulation technique
Check back on Friday for pictures from the class. Thanks for stopping by!

Friday, June 17, 2016

Organic gardening, Maryhill style!

Tangles: Maryhill and Leaflet variation
Now this gardening is for me! I hope you give it a try too!
My inspiration was this Doily stencil by KaiserCraft. See those overlapping Crescent Moons on the outer edge? And the triangular shapes they make when overlapping? Triangles equate to Maryhill for me. I just knew Maryhill could be organically transformed into a mandala, or considering this is a Zentangle pattern, a Zendala!
Here are the basic steps:
I started with a Zenstone or gem and its bezel. All that means is an orb and aura that shape. I think you could also try lots of different shapes besides a circle though too.
Then add the Crescent Moon shapes back to back around the outer orb. Don't stress out over making them the exact same size. It doesn't matter how many moons (or petals) you have, just try not to go small as you will be splitting them and filling them in.
Then, divide your crescent shapes by starting another crescent at the midpoint. Continue around bisecting each Crescent moon shape.
Here's a closer look at what's going on there.
Now fill in each section with Maryhill.
Initially I filled in all the sections, but a nice variation is to leave the outer edge empty (see the blue beauty below).
Continue growing your mandala by adding more Crescents and dividing them with more Crescents.
You can shade as you normally would Maryhill, or try color where you normally add graphite, or....just play with it until you have what you like!
I hope you enjoy!

Friday, June 10, 2016

ZIA stencil string mandalas

I'm really enjoying my square hand.book art journal by Global Art Materials. For this page I used one stencil and lightly traced, in pencil, different sections for each of two overlapping mandalas. The stencil is 6" Mayan Calendar by Crafter's Workshop. Just like any other string, some I used, and some I overlooked.
I wanted to try the new tangle Skye, but had a little difficulty with the flow. Luckily the lines I corrected fell inside the finished design. So, the obvious choice was to fill it in! No mistakes, right?
In addition to Skye, I used the tangles Akoya, Pinch, Quipple, Scena and Squid.

Have a great week!

Friday, June 3, 2016

Is Toothless one of Daenerys' dragons?

When I saw the tangle K-Leesi, I knew I needed to pair it up with Dragonair. You'll also find Hollyhock, Shattuck, Hibred, Finery, Floatfest variation, Knase, Betweed, Tipple, Knightsbridge (cuz knights and dragons go together), Striping, Msst and Tortuca. This is approx 5.5 inches square. I hope you enjoy it... as much as I did drawing it!