Saturday, December 31, 2016

ZI(P)A or PIZA?

ZIA, stands for Zentangle® Inspired Art.  I'm thinking this might be a new category, Zentangle Inspired Practical Art.  But then after rearranging the letters, I'm thinking Practical Idea Zentangle Art or PIZA has a tastier ring to it!  What do you think?

My calendar was inspired by a pin using W2.  (I believe you need to have Pinterest to see the link). My calendar is in my bullet journal.  I use it as a journal, calendar, notebook and also practice new tangles or sketch out card ideas. The great thing about a bullet journal is that you use it how it best suits your needs and you can continually change it to do so.  If you're interested in bullet journaling, check this out.  I used Cadent for my calendar, but you could give a try to any grid based tangle.  For more Cadent inspiration, check out Margaret Bremner's Cadent, and then some post which inspired my previous post.  
I hope you have a Happy New Year!


Saturday, December 3, 2016

Maryhill, freeform, triangulated

Still playing with Maryhill.
Initial string (in ink) on an ATC.
Adding in Maryhill.  This time what's new is breaking that bottom section into lines going to two different areas. 
After filling in black areas including highlights created by contour lines.  Then I added some further enhancement with Triangulation.  I rather liked this, but was stuck where to go next.  My husband suggested just keep adding lines filling up the whole area.  
So, that's what I did, using a Graphik Line Maker (graphite color).
And below, some additional triangulation with the gray pen, shading with pencil and Fabrico gray marker.
Wishing you a good week...

Tuesday, November 29, 2016

More Freeform Maryhill

Apparently this is my mac-n-cheese tangle...at least for the moment.  So, still one step at a time drawing, but I took a few less photos for you this time.  I think you get the drift by now though, right?   Enjoy!

My line with character!
I added one Maryhill section before I realized I'd like to sprinkle on some Printemps.
Back to filling in with Maryhill.
Pokeleaf wanted to join in and more Printemps too.
Those "holes" in Pokeleaf were inclined to jump off their leaves in a few spots.  Bijou thought this was looking like his type of garden.
I added the gray background with Copic markers.  Then as I started with graphite shading, I realized the two grays didn't work so well together.   So, for the most part, the shading is done with Copics (N1 & N3)

Sunday, November 27, 2016

Freeform Maryhill


One step at a time.

You may have noticed, I've been away from the blog for a few weeks.  Sometimes things happen that shake your belief in humanity.  Those are times to stop and breathe, reassess, gather those important around you and make sure you're on a correct path before taking another step.  If you need to alter course, there's no time like the present.  When you're sure the path you're on is right for you, continue with one step at a time.  Since Zentangle® is such an inclusive community, I know there are a few of you who may be reading this that don't understand my grief over an election, and those that believe I am totally wrong.   To those people,  I can only say that I sincerely hope that I am wrong about our president elect and you are right.  

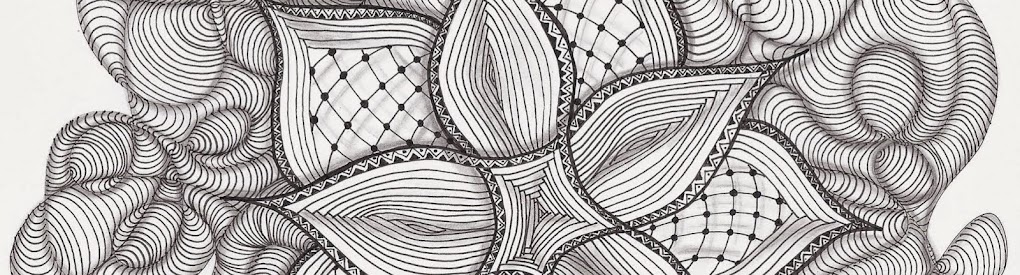
Maryhill, the way it gathers itself before striking out again, is quite appropriate for me.  Deliberate lines in more than one sense.  

This is an extremely long post with the multiple photos along the way so you can see how basic this is, it's just continuing one step after another that produces such a beautiful result.  If you enjoy this freeform Maryhill, check back in the next few days for more examples.  

Start with a line.  I suggest one with several abrupt turns and maybe a nice curve or two.  I used a tile with a watermark because I just knew this tile could be special.


Fill in a section with Maryhill.  You can begin anywhere, but until you get the hang of it, start your aura next to an end point or one of the corners.   Be sure to continue the aura around at least one corner before coming to a point with your line (I see this as coming to center.) Although I have my tile in the same position for each photo, I was continuously turning my tile as I was drawing.  I tend to pick up my pen at every turn and rotate my tile to a comfortable position before continuing each line.  Check here if you want a basic Maryhill refresher.


Your lines can rest on an existing line (above) or hang out in the open (below).
As you can see, the lines don't have to be perfect.
Here (below) I just extended one of those lines that was "hanging out"...
...and then filled that in.
When you're getting the hang of it, you might try to draw a line behind in Hollibaugh fashion.
Look at the dimension happening already.
Below, my lines that were hanging out weren't even, so I took advantage of that by adding another line that swerved as well...
...And just kept going.
If you end up with a gap here and there, don't worry, you can deal with it later.
You can always add another line with corners and curves. (Notice the left side takes off of an existing curved line, so you can always use your take off and land -Cadent skills.  It also is drawn behind an existing section--like Hollibaugh.)
Below, I have both ends coming to a point.  Not really intentional, just kinda forgot what I was doing for a moment, but that's ok.


Notice below that I extended that curved line.
I know, hard to tell in some of these what's different.  Thats because our steps seem redundant, we've been here before, but you JUST KEEP GOING.
Here, I've decided to add some contrast and try to tie some areas together as well as have your eye travel all over.  Some depth and highlights.

If there are areas you're not entirely happy with, give them a little more attention.

And, possibly most important, take the time to consider different shades of gray.


Friday, November 4, 2016

ZIA heat debossing with dies

If you have a die cutting machine and thin dies, check out this YouTube.  A quick overview is that you carefully ink your die with embossing ink, then run your die with paper through your machine to emboss only (not cut).   Instead of being embossed (or raised) the line is embedded in the paper or debossed.  After heat (de)embossing you are left with the thinnest line.  I, of course, felt the need to combine the technique with tangling.

Here is my first attempt after heat embossing.  (Cheery Lynn die)  

And after tangling, trying to get a variety of fragments in those little spaces...

So, the Diva challenge this week was Halloween themed, or white on black.  Ok. Did I have something scarier in my dies? Not sure if it's Halloween, but I think if I bumped into a dragon I'd definitely have a scare!  So, another Cheery Lynn die.  Isn't it beautiful?  

And a few other dies and an embossing folder I thought I'd give a try.


The completed dragon after adding Tipple, Yincut and then drawing in lines like I was filling Isochor. I used metallic gelly rolls.  

And the teacup stack (die by poppystamps) with Tipple and Florz.  I needed inspiration for a background and thought that Florz would be nice.  The Mosaic app is a great reference to search for inspiration.  I searched for black tiles with the Florz pattern and found CharlotteJ_CZT20's tile which inspired mine.  (Hers is really awesome, you should check it out if you have the app.)

This Chevron die (by My Favorite Things) ended up being the foreground for Scena.

Trying the technique with an actual embossing folder (crazy right?;-). I used this fun Spider by Sizzix. 

Do you see all that excess embossing powder?  Only the spider is debossed.   The powder just stuck everywhere else.  Some might have viewed it as ruined, or at least attempted to brush away all that powder before heating, but I thought it looked kind of cool and that maybe I could work it into the design.  

That happy accident turned out to be the best part of my completed ATC don't you think?  That's 'NZeppel and Rain gracing the card.  I used a combo of white ink, pencil and zenstone in addition to gray Fabrico.

Did you catch my NFluxel last week?  Just thought I'd ask since I had two posts last week.

Have a great week!

Saturday, October 29, 2016

NFluxel

I was working on slider cards this week, the coloring went smoothly, but I struggled with the slider mechanism and proper placement. And I needed to get them in the mail.  It took me a few days to complete them.  While I was working on those, I had this week's Diva Challenge in the back of my mind, which was a duo tangle of 'NZeppel vs Flux.  I love the challenge of duo tangles as I try to somehow combine the tangles if I can.
The trick to 'NZeppel is to think of that fill shape as a balloon expanding to fit the grid.  I knew with the duo tangle that I wanted to try having the fill shape be Flux.  But what I had in my mind was a more structured grid.  
When I finally got those Halloween slider cards done and in the mail I sat down to give the duo tangle a try.  This is what poured out of me instead.  And it did just pour out.  Those moments when the Zentangle takes control and you just follow along, are the best!  The contrast between struggling with the cards and then the duo tangle just happening was amazing.  Here is my first attempt in my bullet journal.

 I thought I'd share the process with you in case you wanted to play along!  This should get you started...
Add some Flux along the edge.  I suggest starting fairly large.
Rotate your tile 180 degrees and add the strings.  I did mine in ink, but you could choose to do it in pencil like a typical string.  As you draw the lines, think of the take off and land technique and have the lines follow the flow from the Flux shape.  Note, I like to pull my lines down which is why I rotated the tile.  Situate the tile to whatever is most comfortable for you. 
Add another row of Flux and then mirror its shape.  Have the Flux fill the space by trying to touch both the string and the neighboring Flux.  Notice the Flux shapes themselves are creating their own grid.
Continue rotating your tile and adding the Flux shapes.

Add more Flux shapes wherever there is room.
You can venture away from the string if you'd like, just try to keep the Flux in tight against its neighbors (remember the trick to 'NZeppel).  Remember to keep rotating your tile and keep filling in with Flux.  I really like adding in a little Tipple here and there too.  And coloring in the remaining bits adds dimension.  Maybe some rounding here and there.

Whether you give my version of the duo tangle a try, or create your own, be sure to check out the other versions on either The Diva's blog or on the Mosaic app.  
Have a great week!
Thanks for your comments, they make my day!